Following on from our LinkedIn Conversion Tracking Guide (the easy way to set up LinkedIn Ads conversion tracking), we also wanted to show you the more advanced way of tracking conversions on LinkedIn Advertising using the “Event-specific” method.
Although this method is slightly more advanced than the “page-load” conversion tracking method, it’s nothing to worry about! It’s still pretty simple to set up, especially if you follow our handy guide 😀
In this post
Before We Start
First-off, it’s important to say that in this guide, we’re going to show you how to set this up using Google Tag Manager. This means that you’ll need to be already using Google Tag Manager on your website or you will need to set it up.
(We’re showing you this method because we believe it to be the easiest and most accessible way to set up LinkedIn Event-Specific Conversion Tracking)
You can read our guide on how to create and set up Google Tag Manager if you have a WordPress website or you can follow the steps in the guide to add the Google Tag Manager container code to the <head> and <body> of your website if you don’t use WordPress.
You will also need to have already installed the LinkedIn Insight Tag on your website.
WATCH: LinkedIn Ads Conversion Tracking Events
How to set up LinkedIn Ads Event-Specific Conversion Tracking
Step 1:
Sign in to LinkedIn and head over to LinkedIn Advertising.
Select the ad account you want to set up conversion tracking for and go to your campaign manager.
On the left hand side navigation panel you need to go to the “Analyze” drop down option and then to “Conversion Tracking”.
You need to click on “Create Conversion” and select “Online Conversion”.
Step 2:
For more information about the conversion setup you can read the steps in the easy Linkedin ads conversion tracking setup guide.
Or follow the streamlined version here:
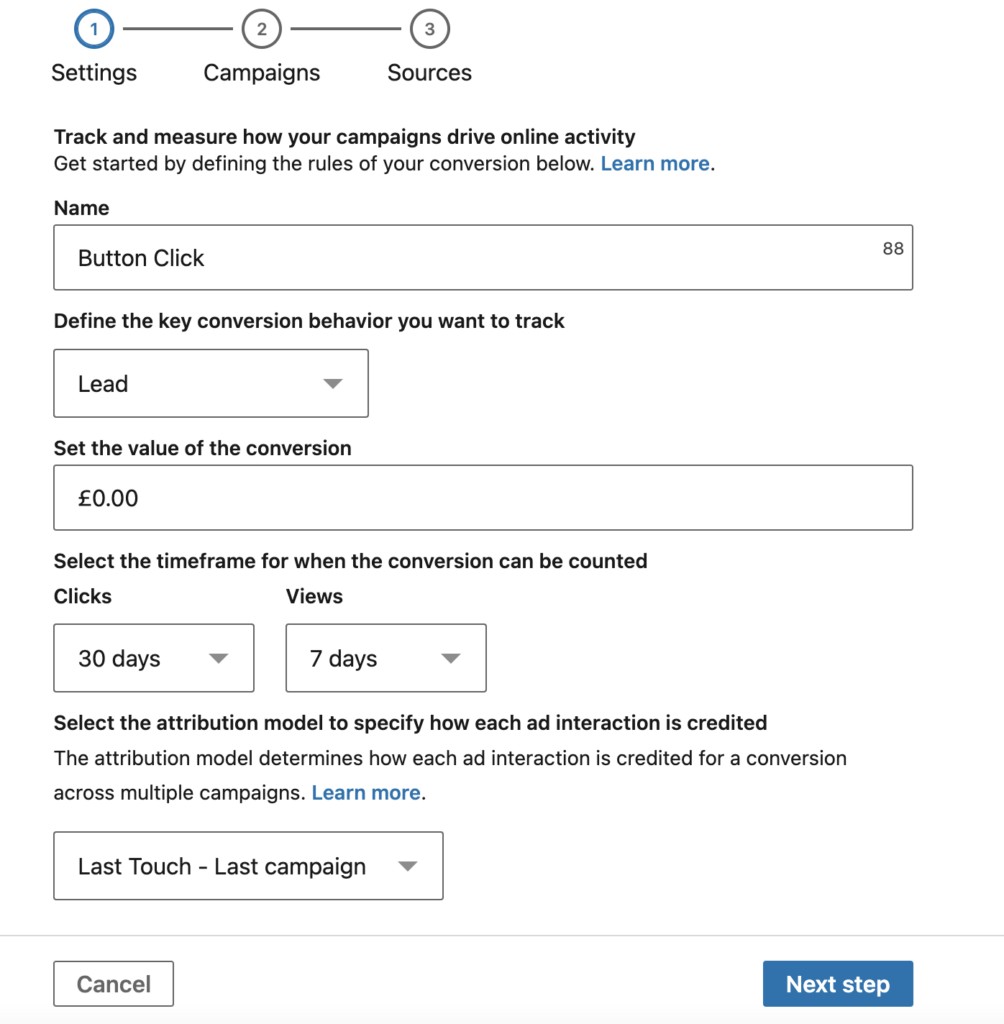
– Give your conversion a name (try to be descriptive) For example, “CTA button click”.
– “Define the key conversion behaviour you want to track” – Select the conversion type from the drop down list that is most suited to the conversion you want to track.
– Add your your conversion value (optional)
– “Select the timeframe of when the conversion can be counted” decide on what conversion window you would like by selecting the timeframe for the click and view conversion window.
– Select the attribution model, we recommend selecting “Last-Touch – Last Campaign”.
– Go to the next page and select the campaigns you want to with your conversion (optional). You can do this at a later date if you need to.
– Go to the next page and here is where we’ll define the event-specific conversion
Step 3:
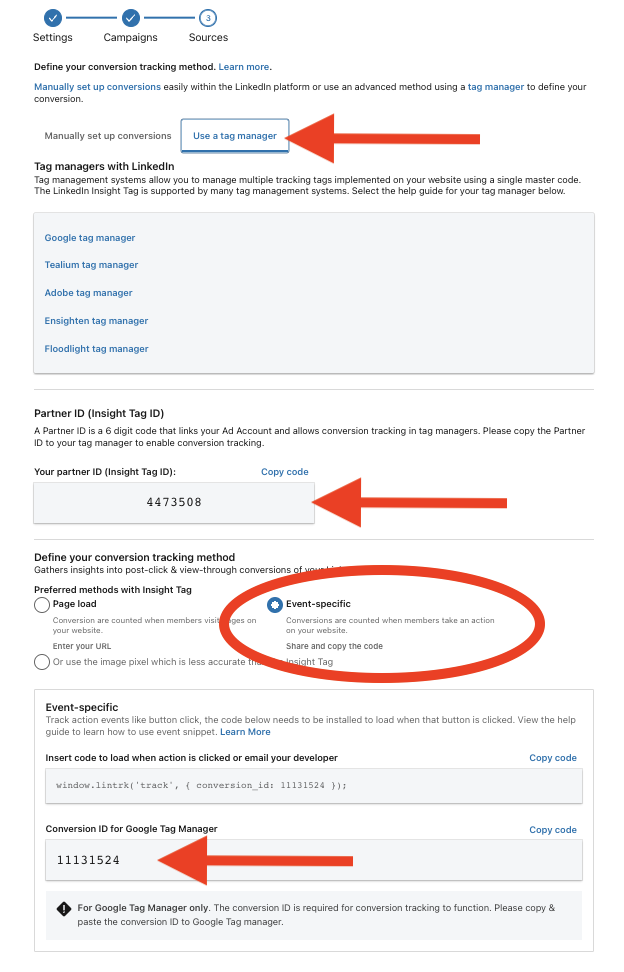
In the section where it says “Define your conversion tracking method” you need to select “Event-Specific”.
Then, at the top you should see a tab that says “Manually set up conversions” or “Use a tag manager”. Select “Use a tag manager”.
This will give us the details we need to set up our conversion event in Google Tag Manager.
Step 4:
Copy or note down the “Conversion ID” number and your “LinkedIn InsightTag ID” and then open a new tab in your browser.
Login to your Google Tag Manager account and go to the GTM container that is installed on the website that you want to set up conversion tracking on.
Step 5:
Configure Variables in Google Tag Manager
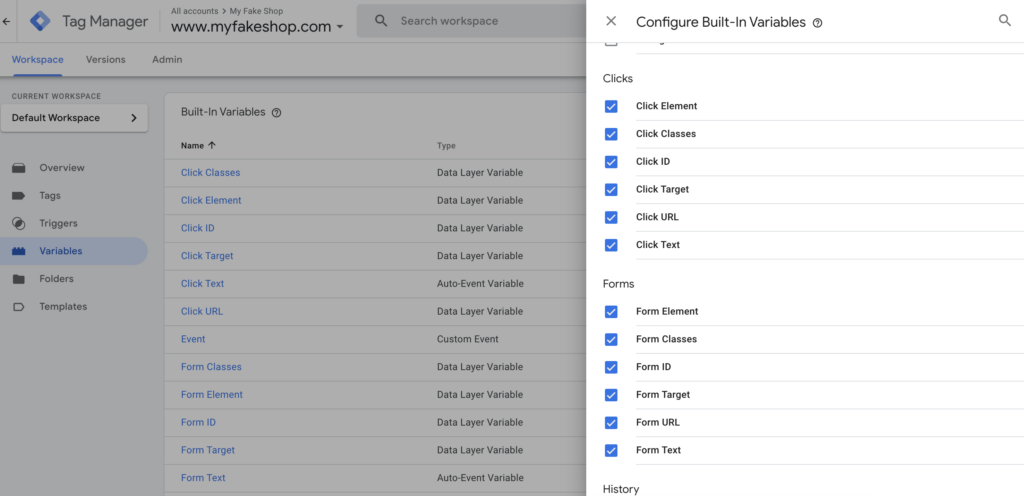
If this is the first time you have used Google Tag Manager then it’s likely that you’ll need to configure your variables before we go any further. However, if you’ve already configured your variables for things such as Clicks & Forms then you should be ok to skip this step.
On the left hand side navigation, go to “Variables” and click on the “Configure” button.
Scroll down slightly on the right-hand panel that opens and look for the “Clicks” section.
Check all of the boxes under “Clicks” and check all of the boxes under “Forms”. We may only need one or two of these variables at the moment but checking them all while you are here saves you time in the future 🙂
Step 6:
Set up triggers in Google Tag Manager
In our example, we’re going to be setting up an event conversion for a button click so we can set up a trigger for all click events on our site. This will enable us to analyse all of the click events when we enter the preview and debug mode in Google Tag Manager.
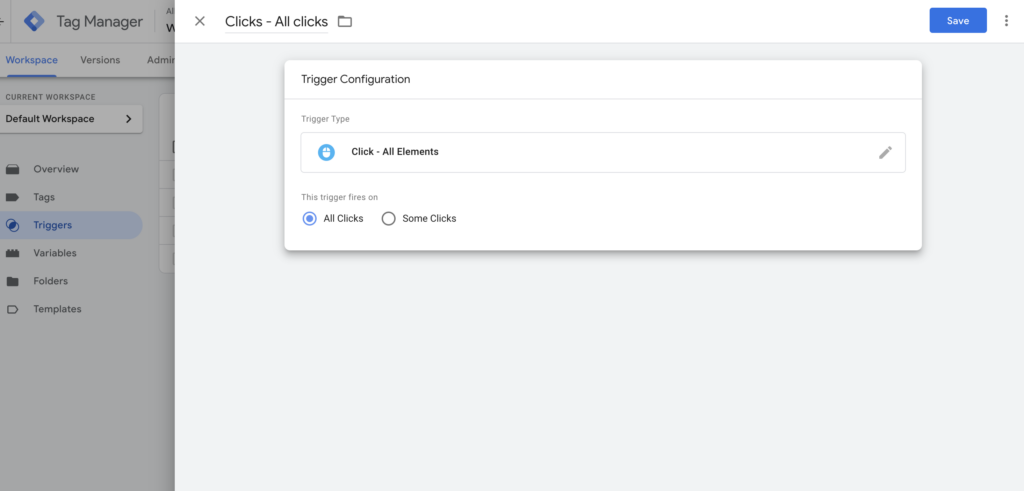
On the left-hand side navigation panel select “Triggers” and then click “New”.
Name your Trigger something like “Clicks – All”.
Click on the “Trigger configuration” box.
Then, under “Clicks” select “All Elements”
Leave this trigger to fire on “All Clicks” and hit the “Save” button.
Step 7:
Identify unique variables in the data later
We need to identify something unique about the button we want to track so that we can set up a trigger for when these unique specifications are met.
We can do this by investigating the data layer variables in the preview debug mode.
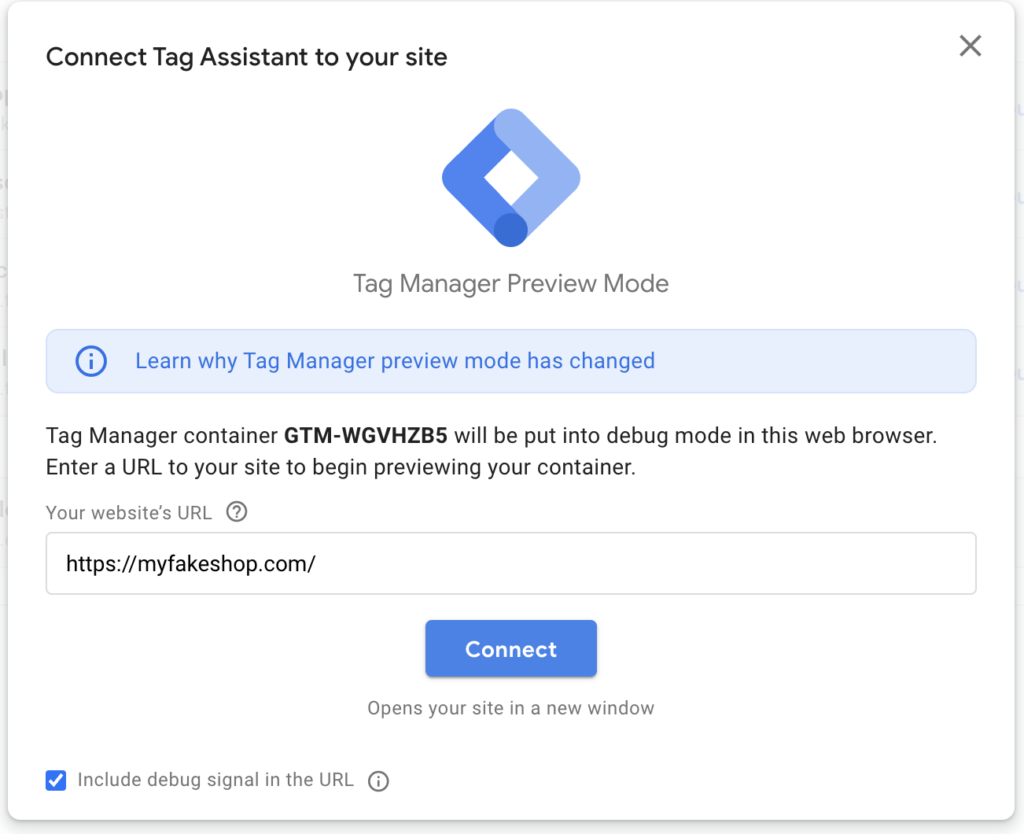
In the Google Tag Manager interface click on the “Preview” button.
This will bring up the new Google Tag Assistant.
The box will ask you to input your website. Once you have done this, click “Connect”
This will open a new tab where you can interact with your site.
Complete the button click action that you would like to track in the debug window, (basically, complete the conversion action yourself).
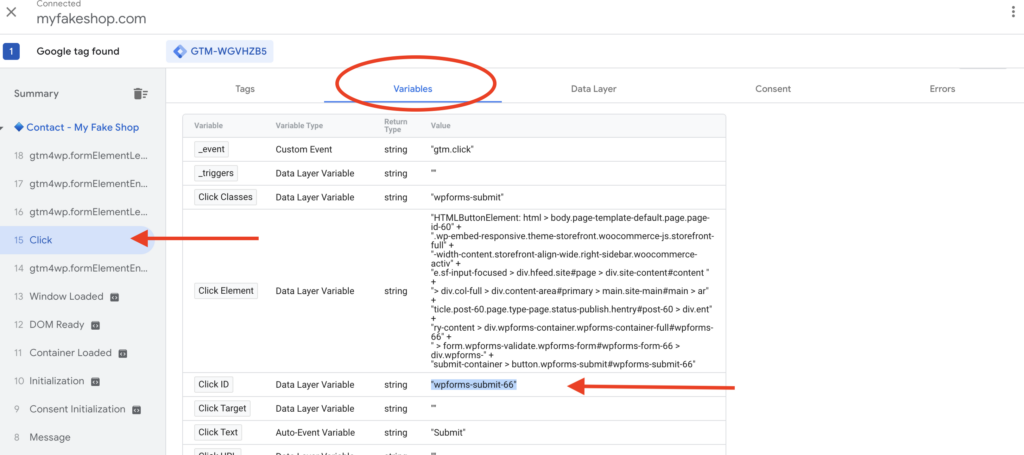
Head over to the tag assistant tab.
On the left-hand side, in the summary panel you will see a list of the events that Tag Assistant has registered. Find the “Click” event that was the click you made on the button that you wish to track.
In the main panel select the “Variables” tab. Here is where you will find some unique values that you can use to set up your trigger.
In our example, we’re going to use the “Click ID” Data Layer Variable that has the value of “wpforms-submit-66”.
Important
It’s important to note that this data layer variable value will be unique to your website. You might find that you can use the “Click ID” like in my example but your value will be different to the value shown above. You may decide to use a different variable like “Click Text”. (Or you may want to set up a combination of variables).
In our example, we will not be using the “Click Text” DLV (data layer variable) option because the value here is “Submit” because this is the text that is featured on the CTA button we want to track (the submission button). We’re not going to use this because “Submit” is a common text which might feature on other buttons of your website, therefore this trigger wouldn’t be unique to this event.
One way to avoid this is to combine this trigger with another DLV value click like “Page Path” or “Page URL”.
Step 8:
Set up event trigger in Google Tag Manager
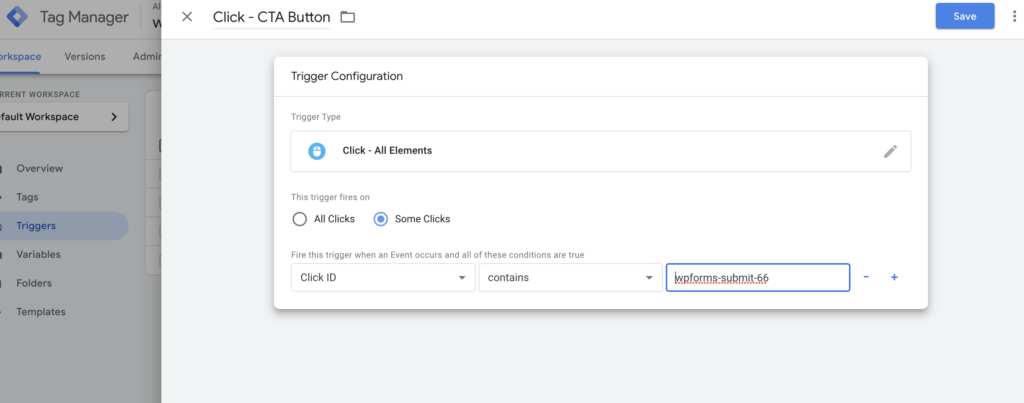
Head back to the GTM interface and on the left-hand menu select “Triggers” and then “New”.
Name your trigger “CTA Button Click” or something similar or as descriptive as possible.
Select the “Trigger Configuration” box and in the “Clicks” section select “All Elements”
Select the “Some Clicks” option and select “Click ID”.
Leave the “Contains” selection and paste the “Click ID” value that you identified in the previous step.
(In our case this was “wpforms-submit-66”) – don’t include the “” marks.
Click “Save”.
Step 9:
Set up LinkedIn event tag
Click on “Tags” and “New”
Name your Tag a descriptive name – e.g “LI Ads – Event Conversion – CTA Button Click”Click on the “Tag Configuration” box and in the “Choose Tag Type” panel you need to click on “Discover more tag types in the Community Template Gallery”.
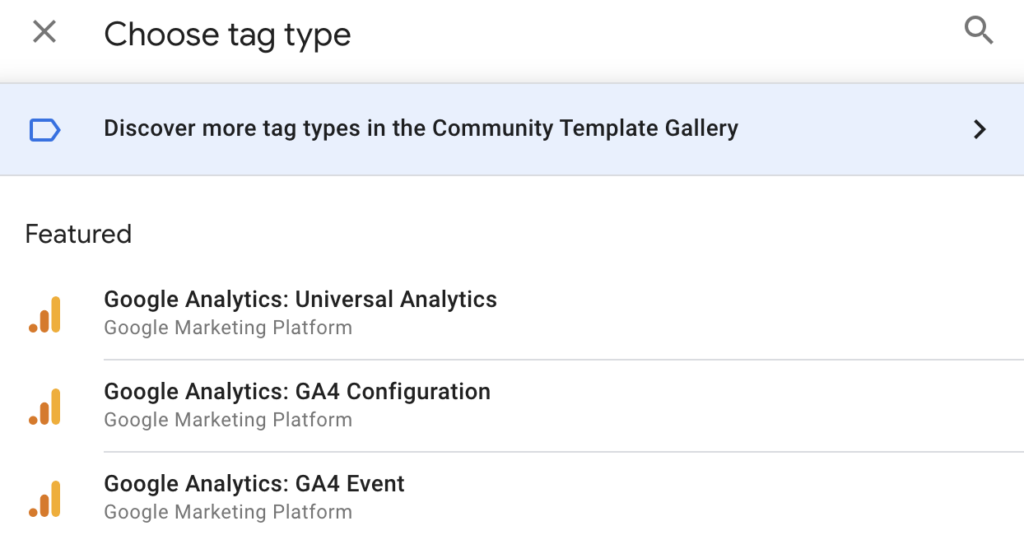
Click the search icon and search for “LinkedIn InsightTag 2.0”.
Find this tag template and add it to your GTM.
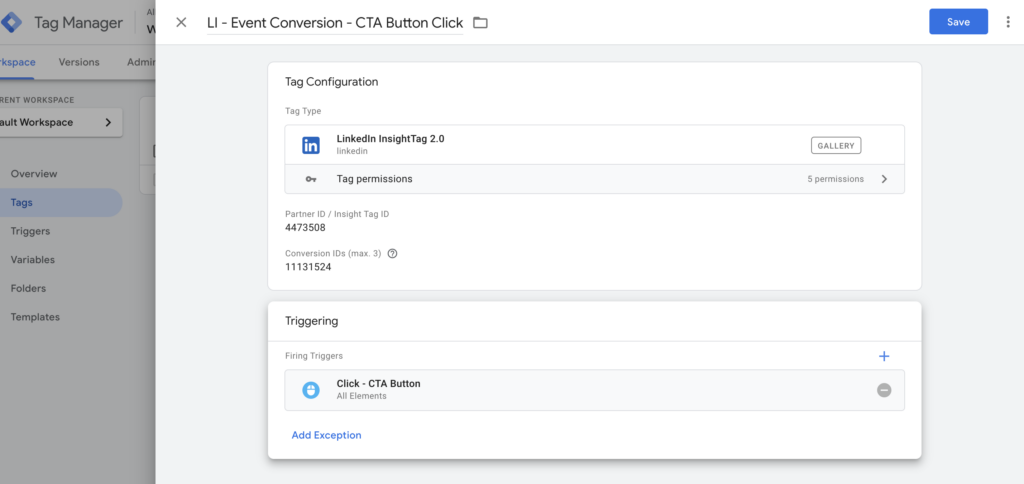
Once added, this should take you to the tag setup options. This is where we need to input the “LinkedIn InsightTag ID (Partner ID)” and the “Conversion ID”. (This is the information in your LinkedIn Ads Conversion setup tab from Step 4).
Then scroll down to the “Triggering” box and select your event trigger that you set up in the previous step.
Click “Save”.
Step 10:
Test that your tag is working, publish & finalise
Click on the “Preview” button again to enter into the preview and debug mode.
Reconnect your website and complete the conversion action that you have set up tracking for.
Head over to the tag assistant tab.
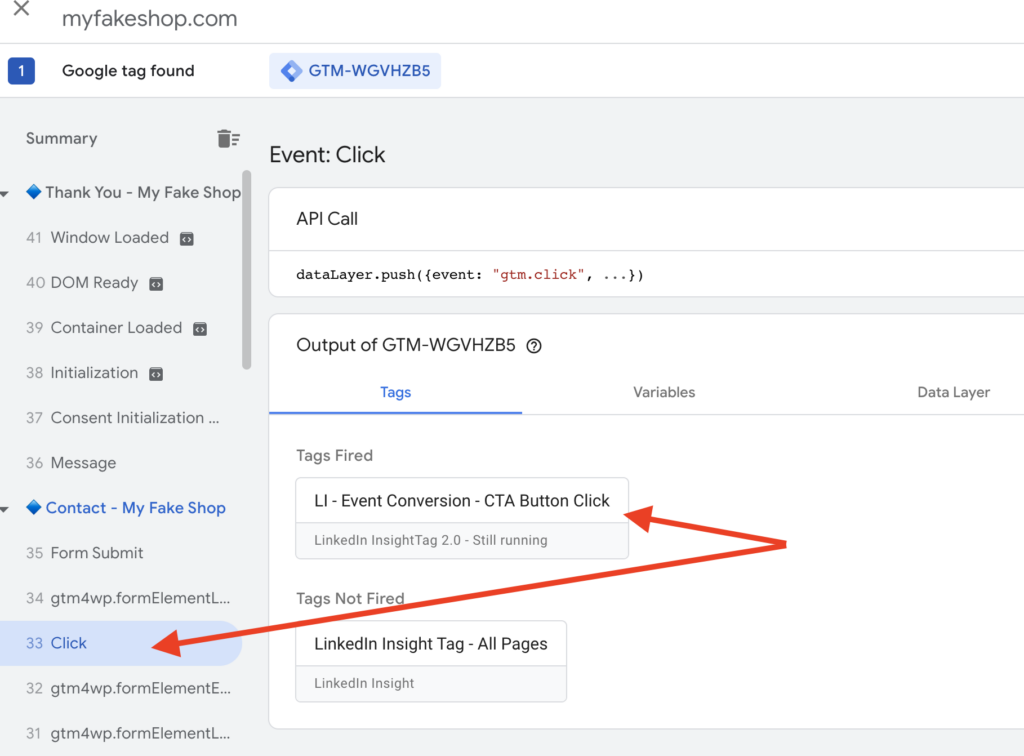
On the “Tags” tab, this should now report to you all of the tags that have successfully fired.
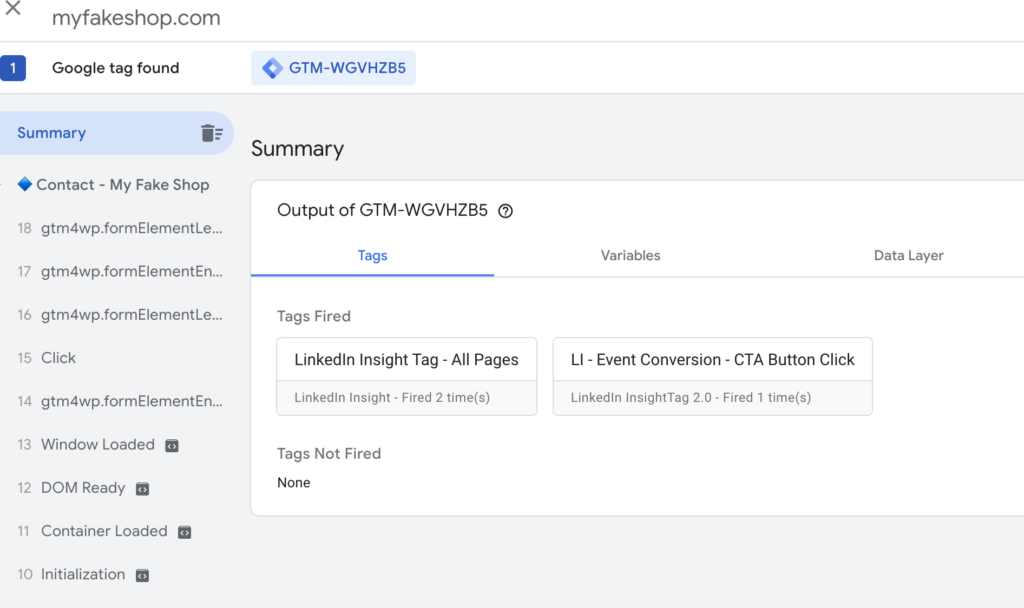
You can even isolate the “Click” event like we did before, and this will show you if the tag fired successfully on that event.
If all is well, you can close down the preview and debug mode and head back to your main GTM interface.
Click on “Submit”.
Fill out the information with some descriptions of the changes you’ve made.
“Publish” the container.
Head back over to your LinkedIn Ads conversion tracking set up tab and finalise the setup.
Test Your LinkedIn Conversion Tracking is Working
To further test that your event tracking is working you can wait for a signal to show in LinkedIn Ads in the “Conversion Tracking” panel under “Conversions”. We explain this in more detail in our Easy Guide to LinkedIn Ads Conversion Tracking.