Installing the Linkedin Insight Tag is super easy! Don’t worry about it. We’ll take you through a step by step process of how you can install it on your own website, without having to annoy your developer with another request from the marketing department 😆
In general there are two ways to install the LinkedIn Insight Tag:
1. Manually pasting the tracking code into your website
2. If you have Google Tag Manager installed on your website already, you can use this to install the Insight Tag.
In this post
The LinkedIn Insight Tag
The LinkedIn Insight Tag is a tracking code that allows website owners to track conversions, retarget/remarket to website visitors, and gain insights into the user behaviour on their website. It helps businesses understand which LinkedIn Ads campaigns are driving the most valuable website traffic, and provides data that can be used to improve future campaigns.
It’s similar to other website tracking codes like Meta’s pixel or the “Facebook Pixel” as it used to be called. Therefore, you may sometimes hear people called the LinkedIn Insight Tag the “LinkedIn Pixel”.
Your LinkedIn Advertising Account
First of all you need to navigate to the LinkedIn Ads account that you want to use. Then you need go to the “Analyze” dropdown menu on the left hand side.
If you haven’t got a LinkedIn Ad account then you will need to create one.
You can head to the LinkedIn advertising platform by clicking on the “Advertise” icon on the top right corner of your LinkedIn dashboard.

Step 1:
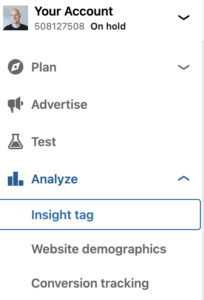
As we were saying… once in your LinkedIn Ads account you need to head to the “Analyze” dropdown and select “Insight Tag”.
Step 2:
If it’s your first time in your ad account then you may see the option to “Create Insight Tag”. Click this button.
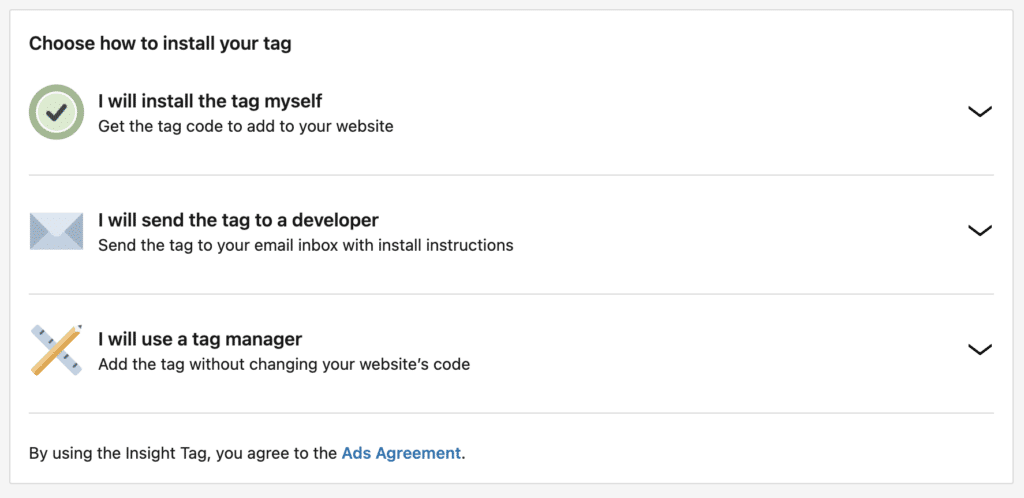
Alternatively, you may see 3 options of how to install the Insight Tag.
– Manual
– Send to developer
– Via Tag Manager
Manually: Install the LinkedIn Insight Tag
Manual Installation
Step 1:
Click the “I will install the tag myself” button.
A dropdown should appear to show you your code that you’ll need to copy.
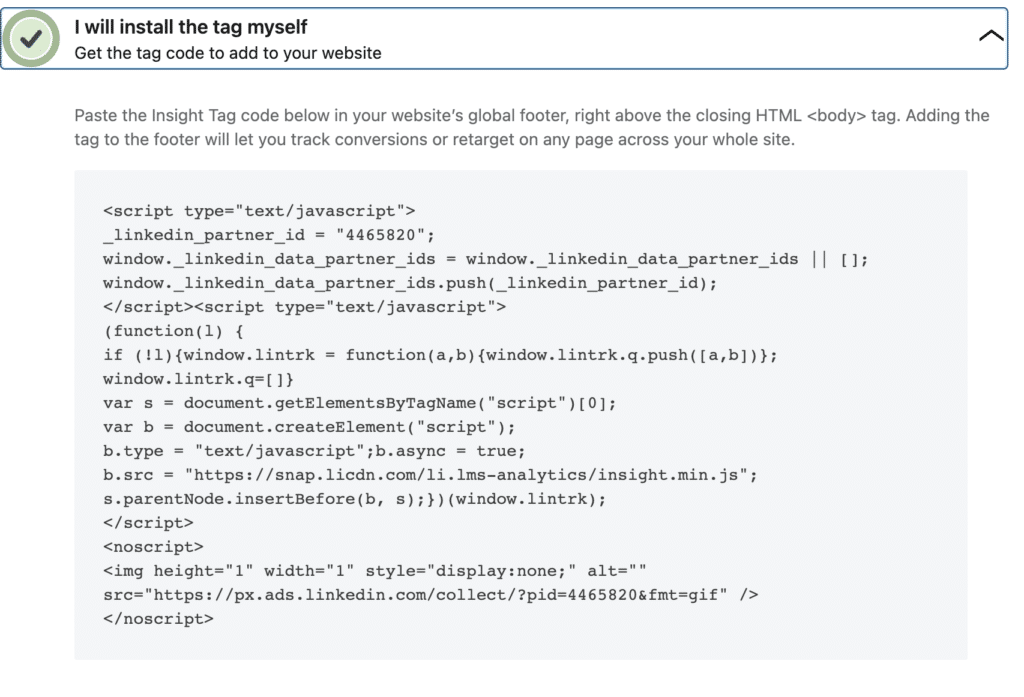
Hover over this code and an option should appear to copy the whole piece of code to your clipboard.
Manual Installation
Step 2:
Once you’ve copied the code to your clipboard, we will need to paste this into the <head> of your website’s code.
You will need access to your website’s backend or “admin” side of your website.
Login to your website’s backend or dashboard and navigate to the area where you can inject custom code into your website’s theme.
Add code into the <head> of a Squarespace website
Add code into the <head> of a Wix website
Add code into the <head> of a Shopify website
(In Shopify, you will find the <head> tag in your “theme.liquid” file.)
Or carry on reading and we’ll show you how
Manual Installation
Step 3:
Install the LinkedIn Insight Tag on a WordPress website

In our example, we’ll be using a WordPress website. However, it’s the same process for any website, the only difference will be how your backend admin dashboard looks and operates.
On your WordPress dashboard, navigate to “Appearance” on the left hand menu and then to “Editor” or “Theme File Editor”.
Manual Installation
Step 4:
You should see the php files of your website’s theme here and on the right hand side you need to find the header.php file.
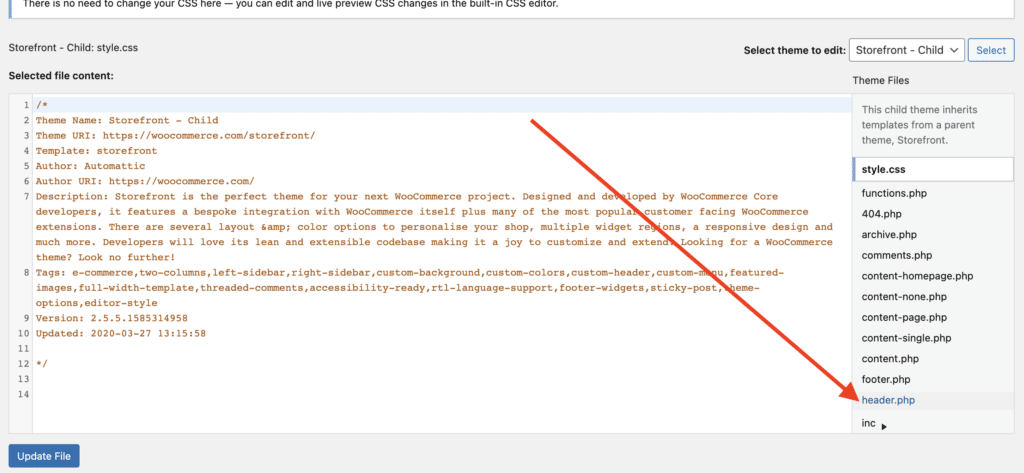
Manual Installation
Step 5:
When you are in the header.php file, you will then need to find the opening <head> tag as well as the closing </head> tag
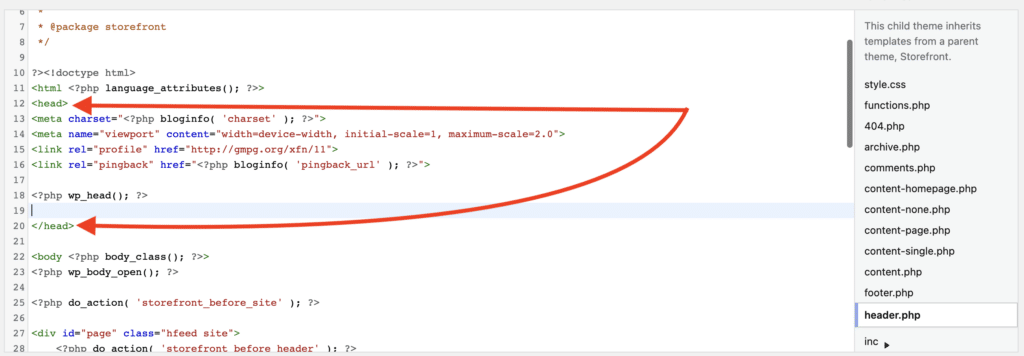
You can then paste your copied code into the section between these two tags, like the example below:
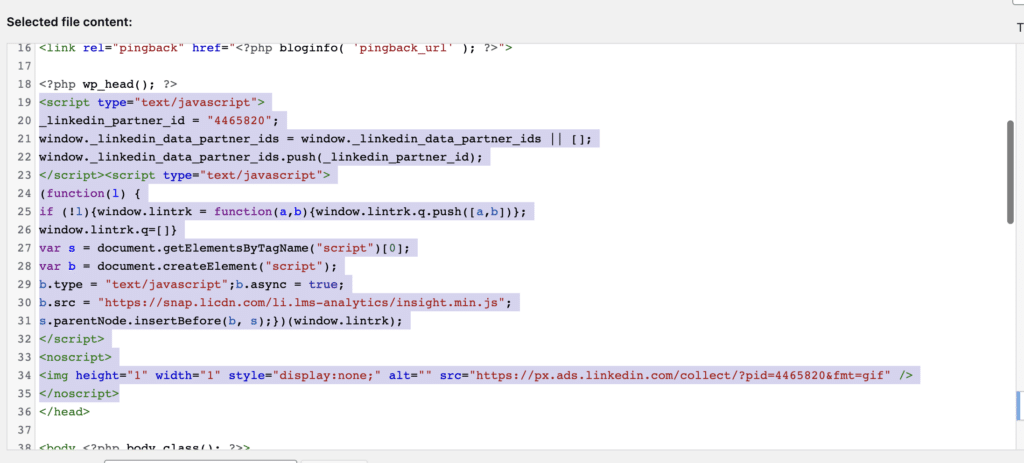
Once pasted, scroll down on the page and click the “Update File” button.
Sometimes, depending on what plugins, permissions or page builders you are using with your WordPress website, you may have alternative ways to add custom code into the head of your website.
For example, there are popular WordPress plugins that help you to insert code into the header or footer of your website. (Like this one.)
Or there are some WordPress page builders that have their own functionality built in to allow you to add code into your site. For example, Elementor and Divi.
Install the LinkedIn Insight Tag on an Elementor website
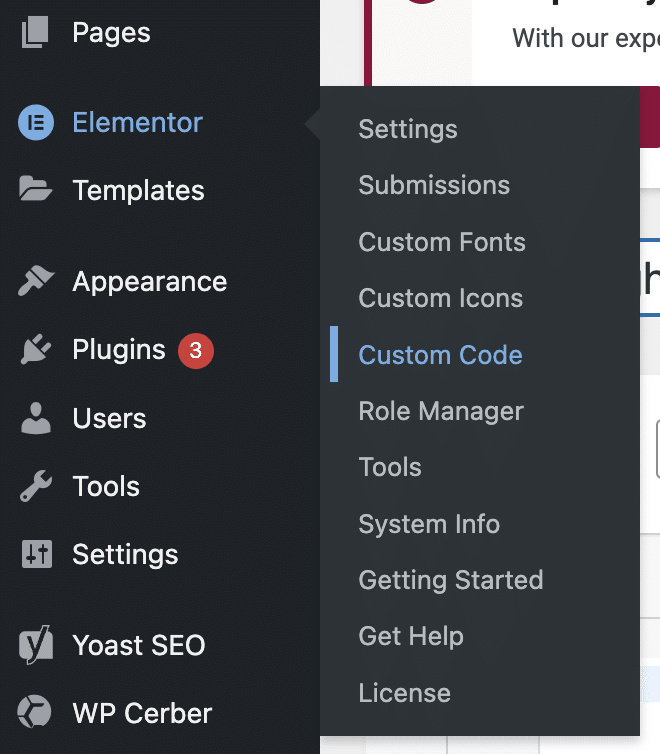
- Login to your dashboard and find the “Elementor” option on the left hand sidebar navigation.
- On the opening panel, scroll down and find “Custom Code”.
3. Give your code a name and paste the LinkedIn Insight Tag code you’ve copied.
Make sure you set the correct “Location” of where you want the code to be deployed. E.g <head>
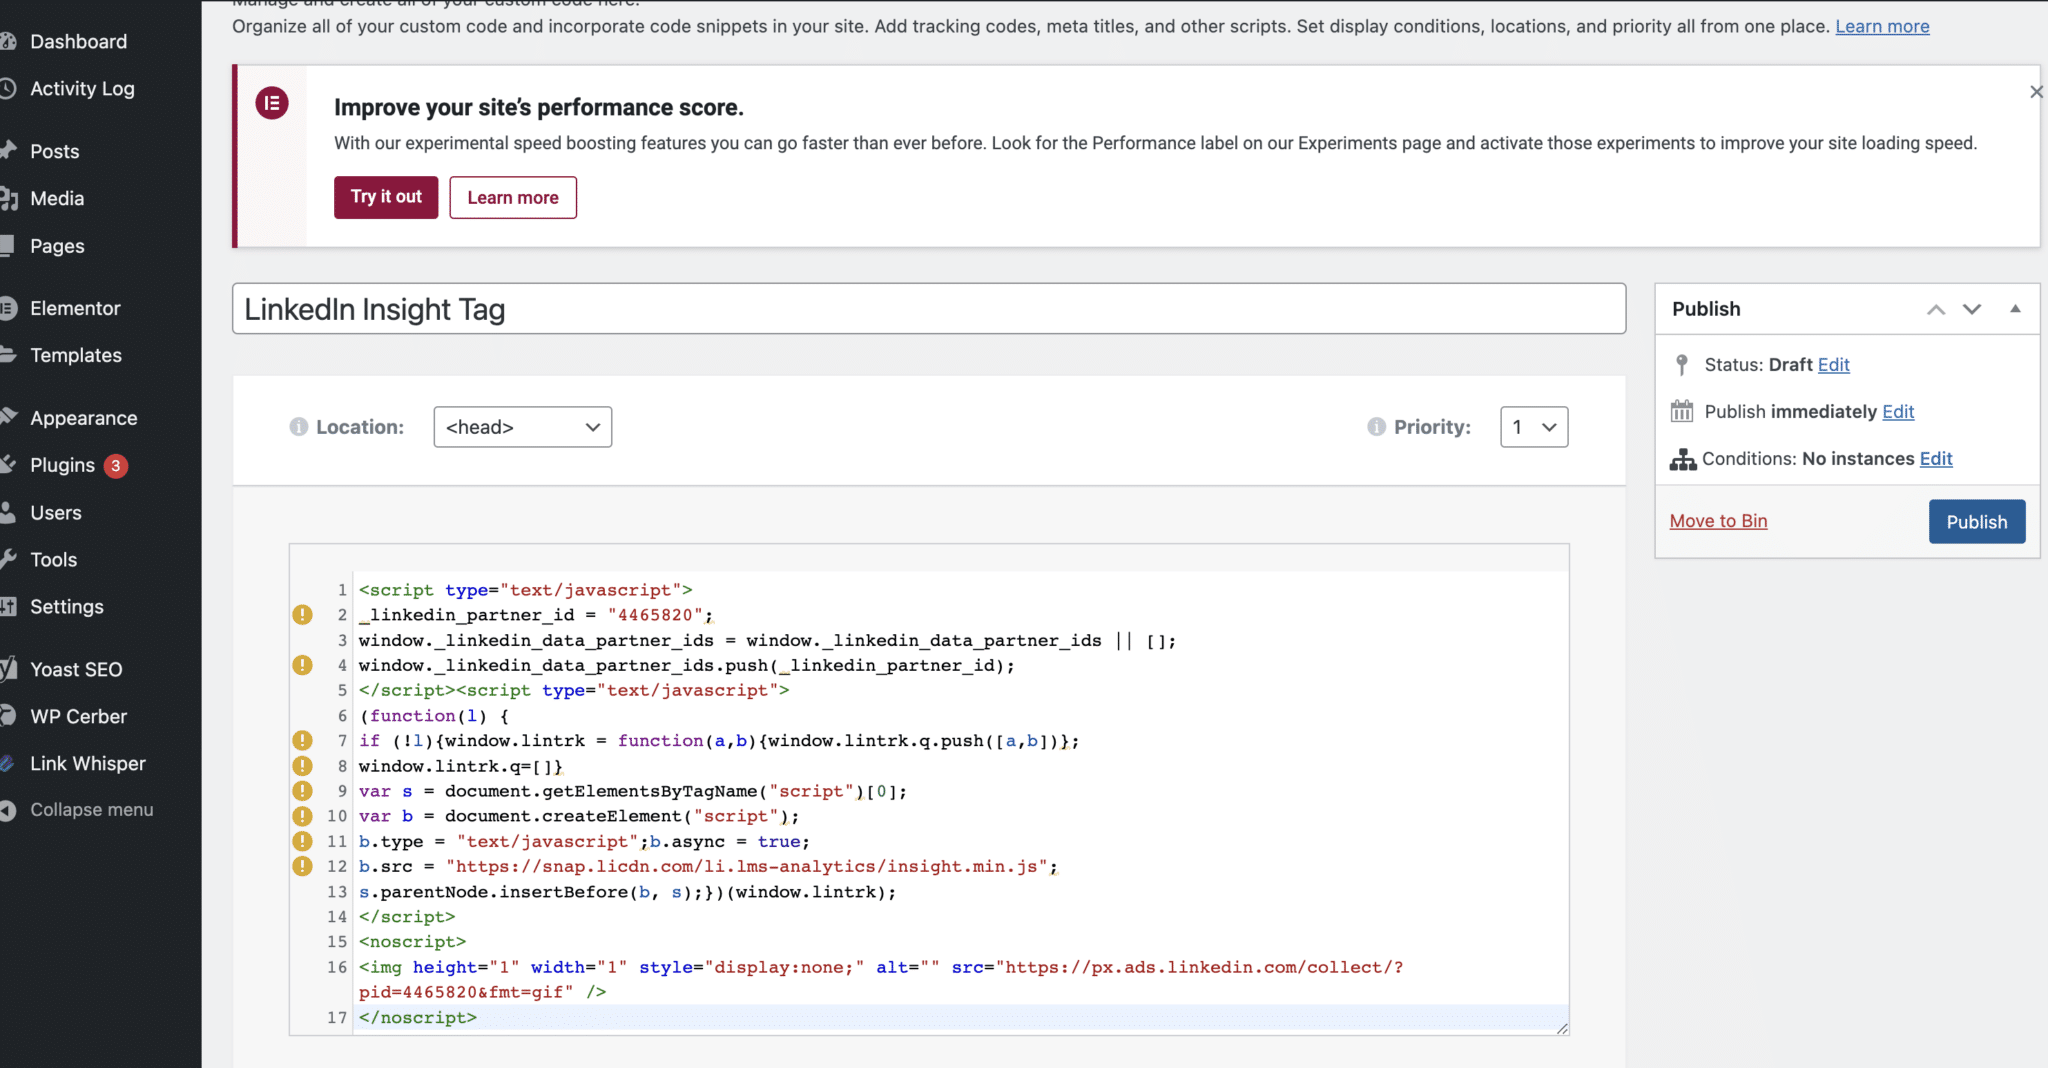
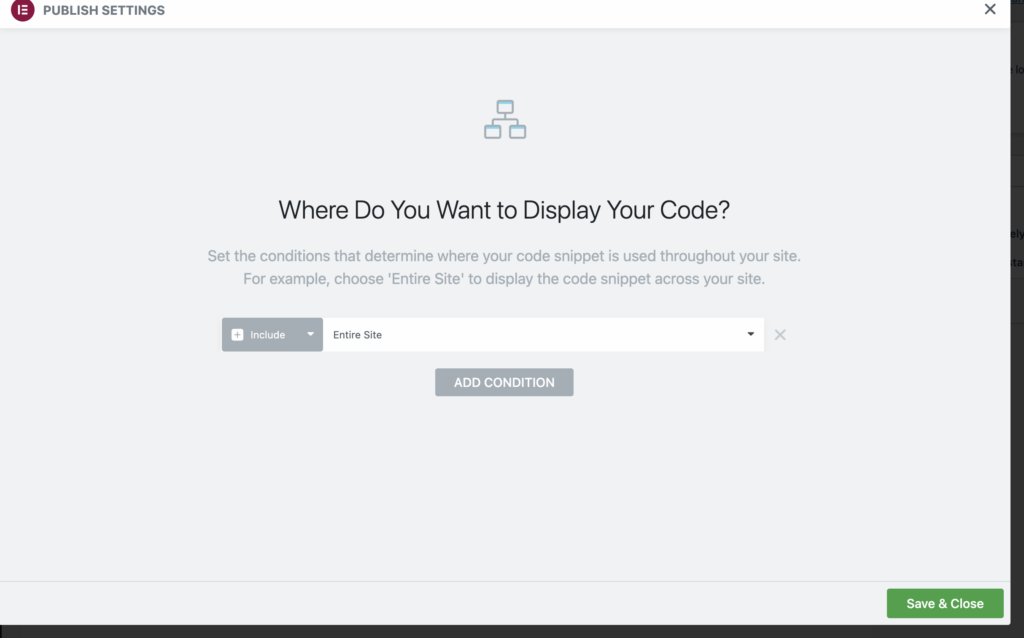
4. Finally, click “Publish” and then select when you want this code to fire on your site. In this case I will select the option of “Entire Site”.
Click “Save & Close”
Install the LinkedIn Insight Tag on a Divi website
- Go to the WordPress dashboard
- Navigate to Divi > Theme options
- Go to the Integration tab
- Scroll down to the “Add code to the < head > of your blog” section
- Paste your header code into the text box
- Click “Save Changes”
(Make sure you’ve enabled the header code selector option)
Install the LinkedIn Insight Tag with Google Tag Manager
You first need to make sure that you already have Google Tag Manager installed on your website.
GTM Installation
Step 1:
Go back to your LinkedIn Ads account campaign manager dashboard.
Click on Analyze > Insight Tag.
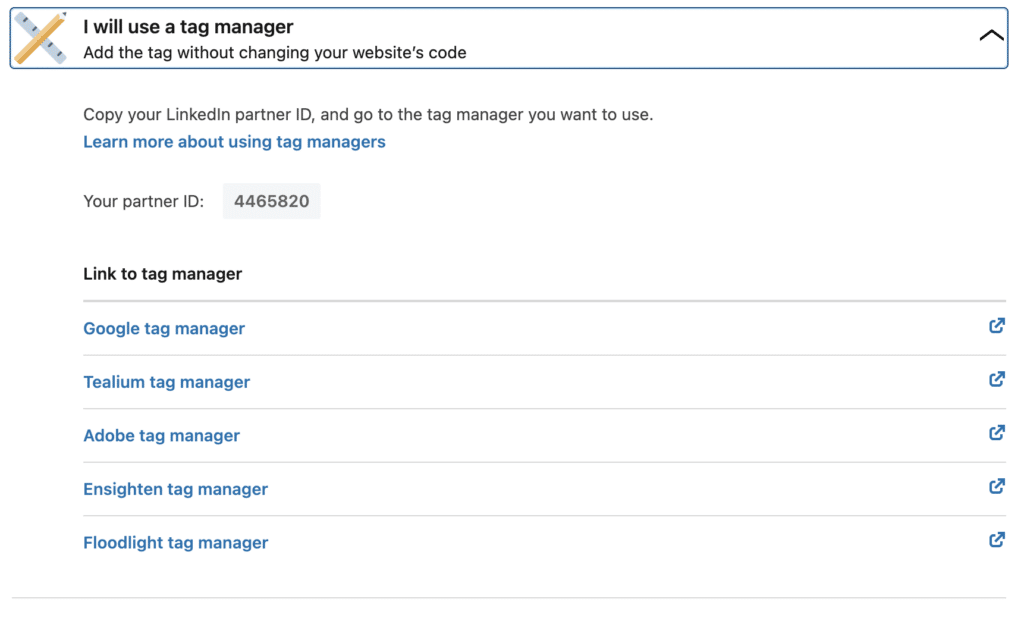
Then select the “I will use a tag manager” option
GTM Installation
Step 2:
Copy your Insight Tag partner ID number. You should be able to hover over this number and click to copy the whole ID number to your clipboard.
Step 3:
Login to your Google Tag Manager account and go to your container.
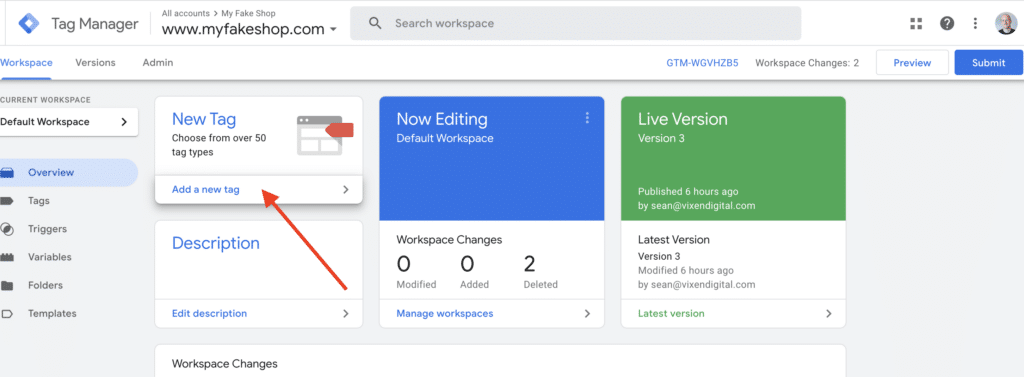
Click on “New Tag” from your workspace.
Step 4:
Name your Tag with a sensible name that will describe what the Tag is for.
E.g LinkedIn Insight Tag – All Pages
Click on “Tag Configuration” and in the search box type in “LinkedIn”
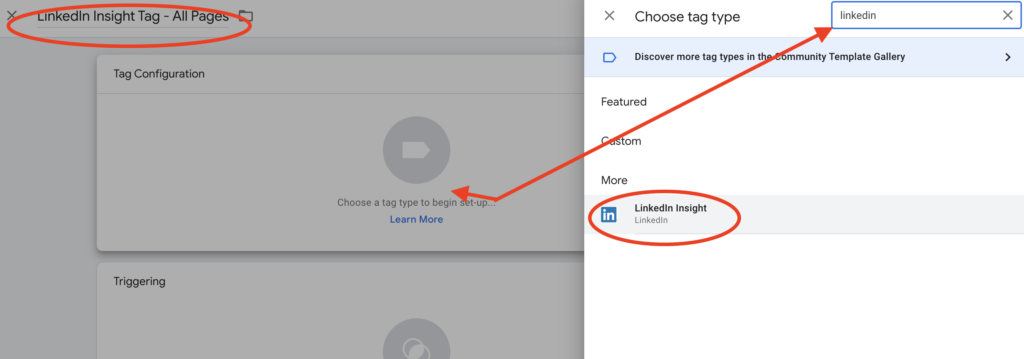
Step 5:
Select the preconfigured LinkedIn Tag type.
Paste your ID number into the box.
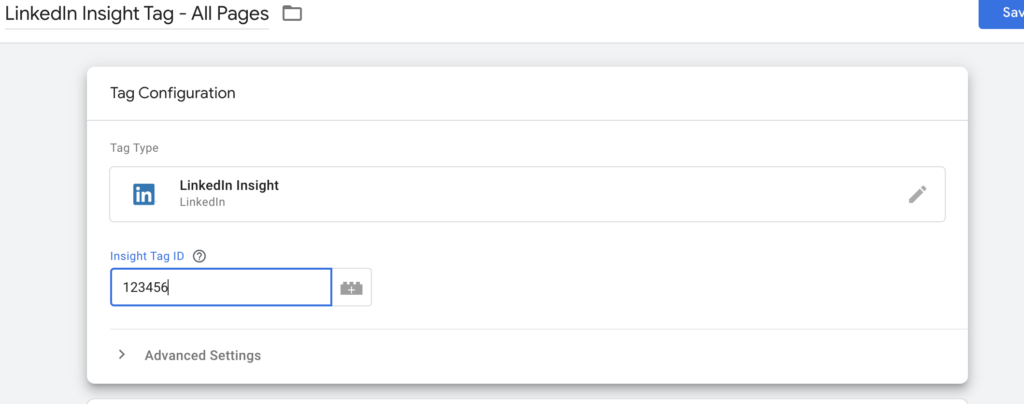
Step 6:
Scroll down and select the Trigger.
In the panel window select “All pages”.
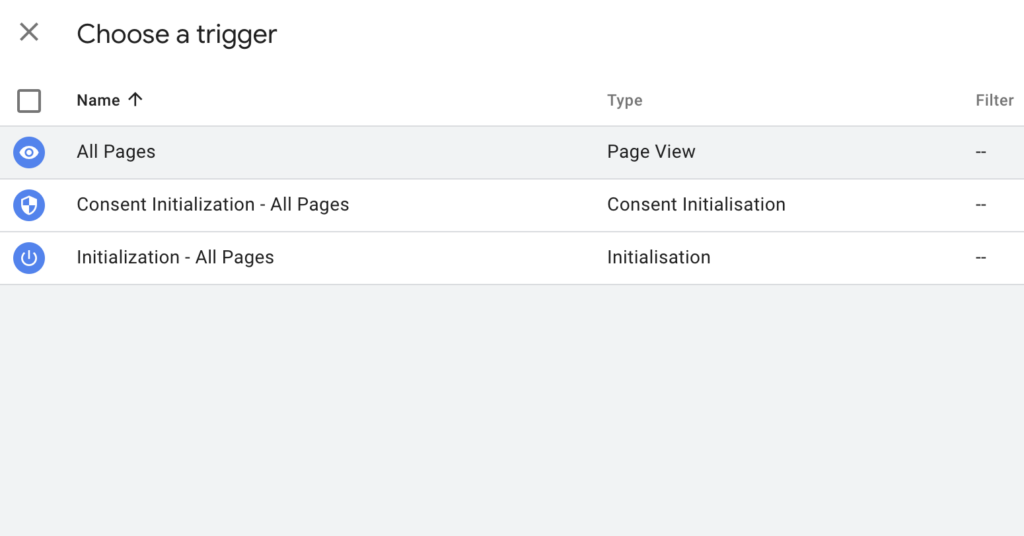
Step 7:
Click the blue “Submit” button in the top right corner to publish your changes to your live site.

Install the LinkedIn Insight Tag on a Wix website
Wix Install
Step 1:
Login to your Wix website dashboard or backend.
On the left hand side navigation panel, select “Settings” and then scroll down and select “Custom Code” in the advanced section.
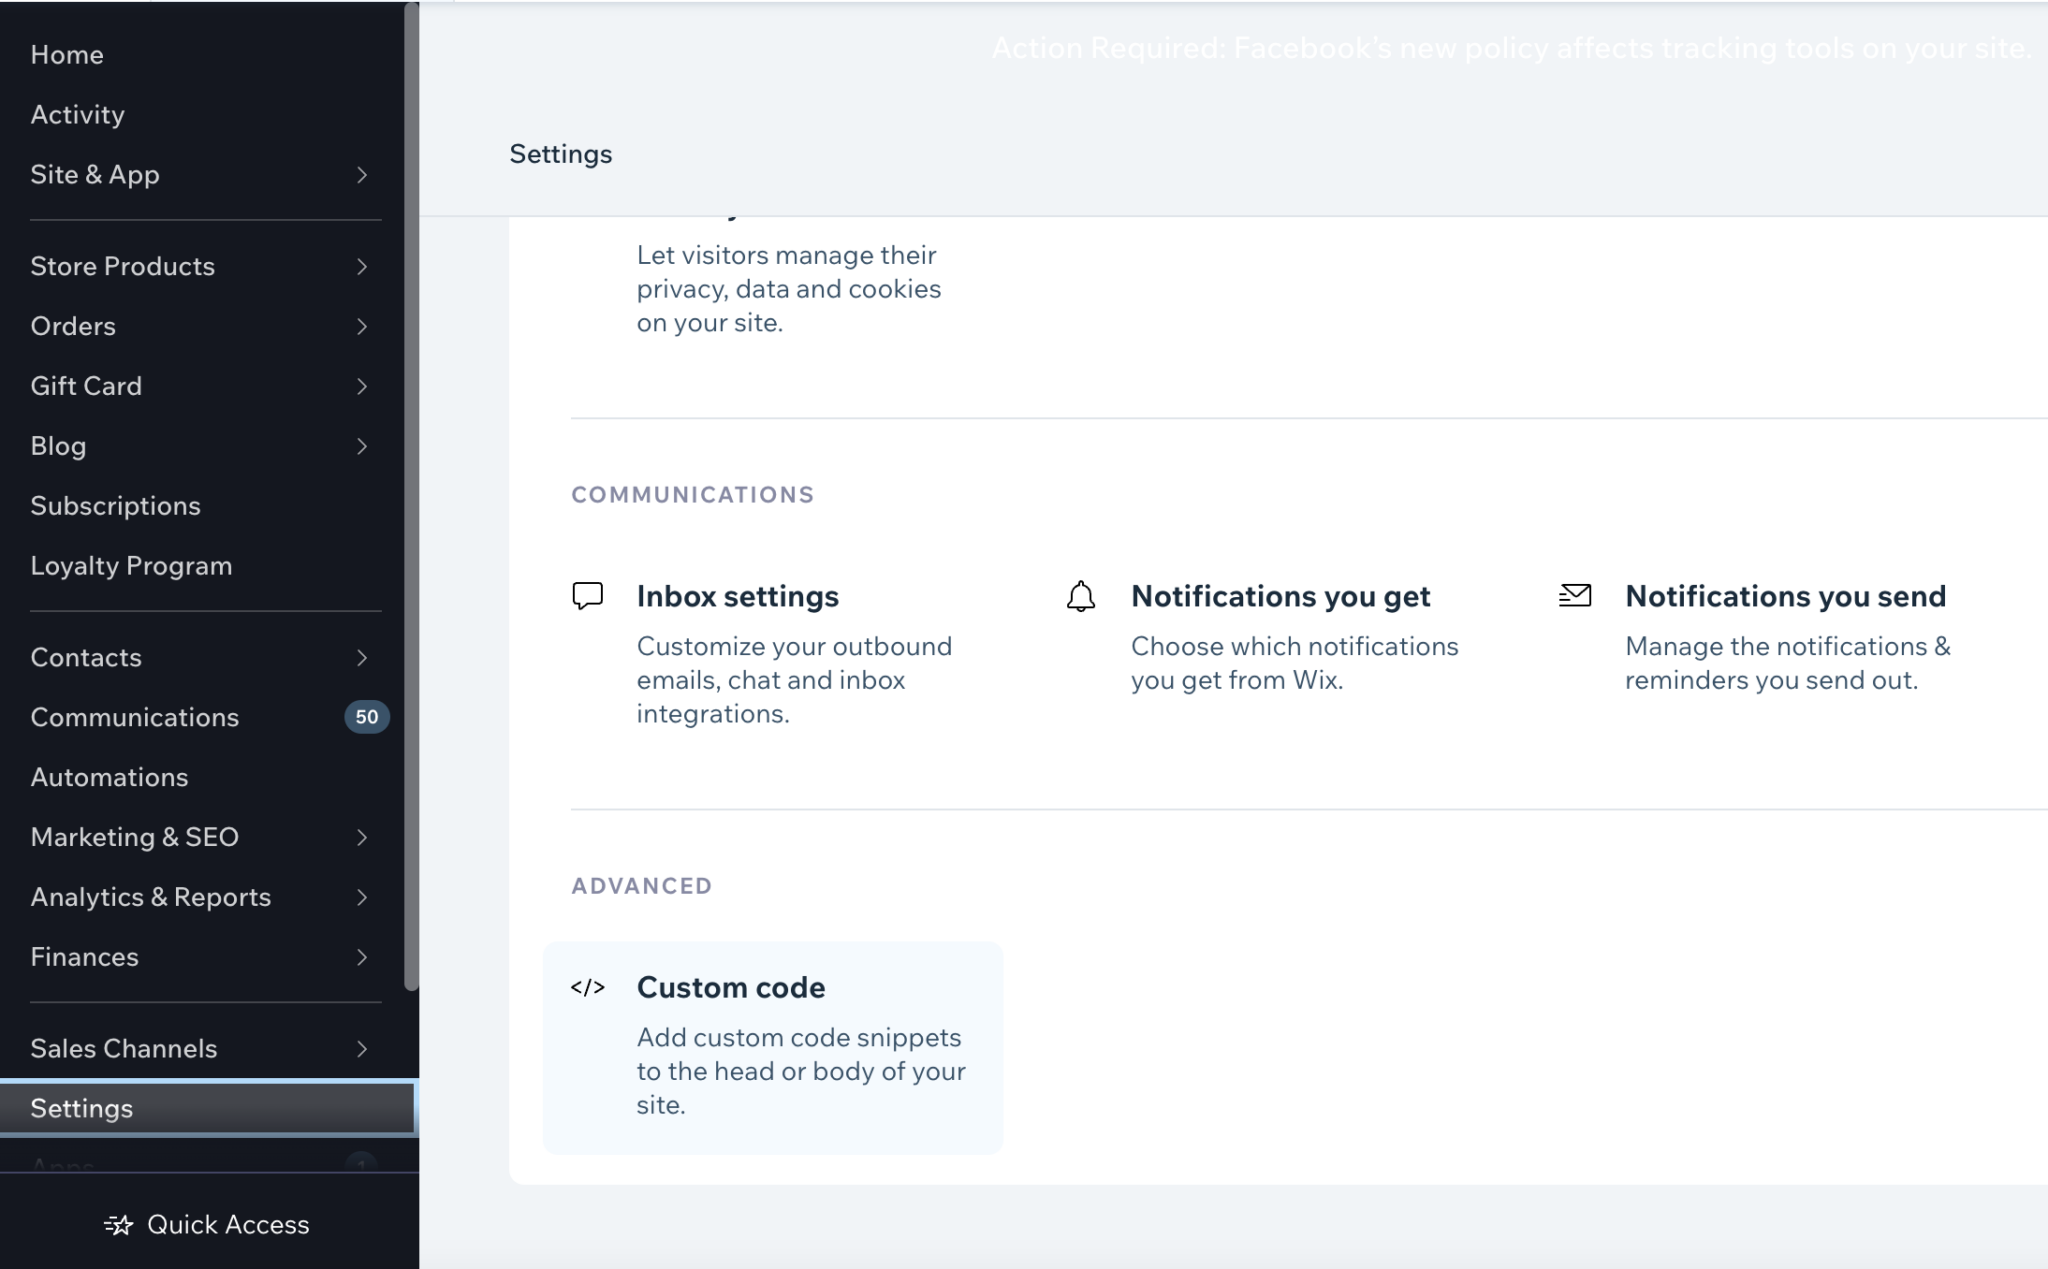
Wix Install
Step 2:
Click “Add Custom Code”

Wix Install
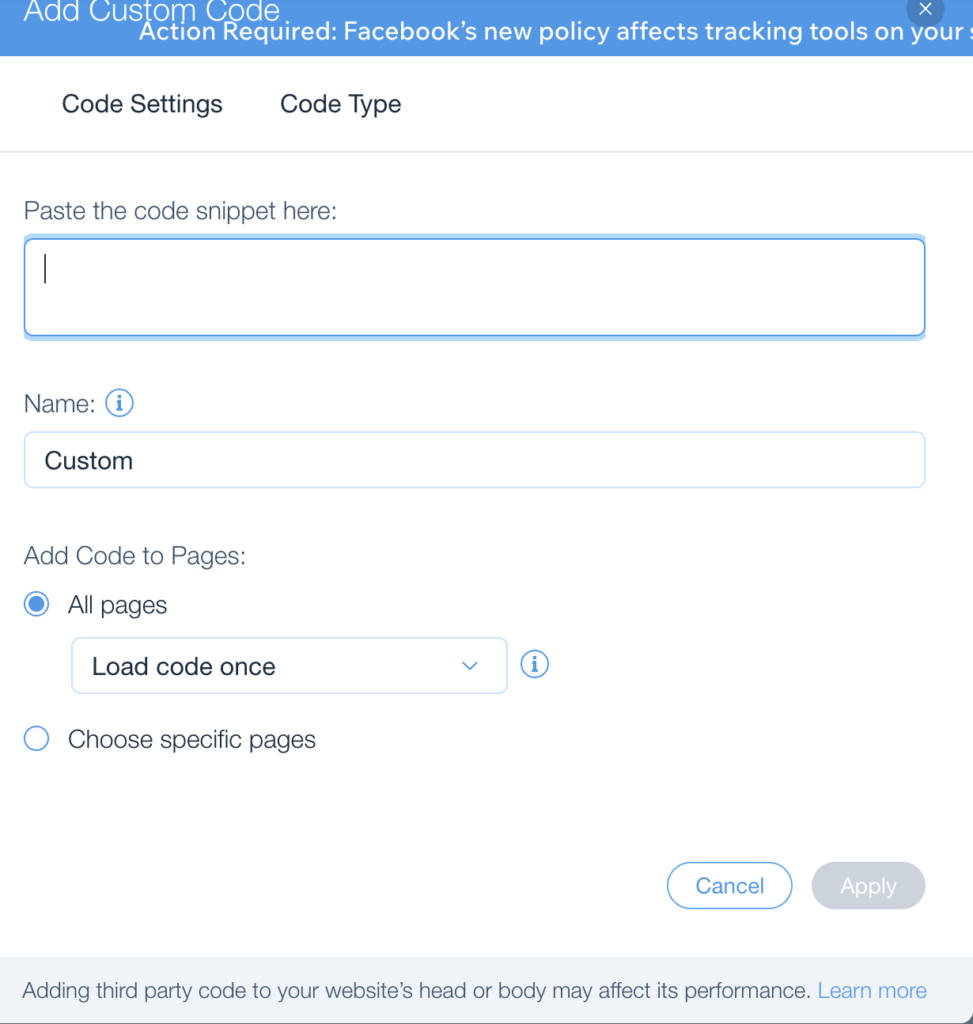
Step 3:
Paste your custom code and assign a name/title for your code snippet.
Click “Apply”
Install the LinkedIn Insight Tag on a Shopify website
To add your LinkedIn Insight Tag Shopify site:
- Login to your Shopify Admin
- Go to Online Store > Themes > Actions > Edit Code
- Locate the “theme.liquid” file in the “Layout” directory.
- Add your LinkedIn Insight Tag code in the <head> section before the closing </head> tag.
- Save changes.
Note: Before making any changes, it’s recommended to duplicate your theme as a backup.
Important:
One thing to mention is that the code that you insert into the “theme.liquid” file will fire on all pages of your website EXCEPT for the checkout pages.
You would need to add the code separately to the “checkout.liquid” file. However, you only have access to edit these files if you are a “Shopify Plus” merchant.
Install the LinkedIn Insight Tag on a Squarespace website
To add the LinkedIn Insight Tag into section of a Squarespace website:
- Log in to your Squarespace account
- Go to the “Home Menu” and select “Settings”
- Click on “Advanced” and select “Code Injection”
- In the “Header” section, paste your Insight Tag code.
- Save the changes.
WATCH: Install the LinkedIn Insight Tag video guide
Check if your LinkedIn Insight Tag is working
Finally, to check if your LinkedIn Insight Tag is working you can go back to your LinkedIn Campaign Manager and back to the “Analyze” menu.
In here you will see “Conversion Tracking” click here.
Then on the main panel you will see “Data Sources”, click this.
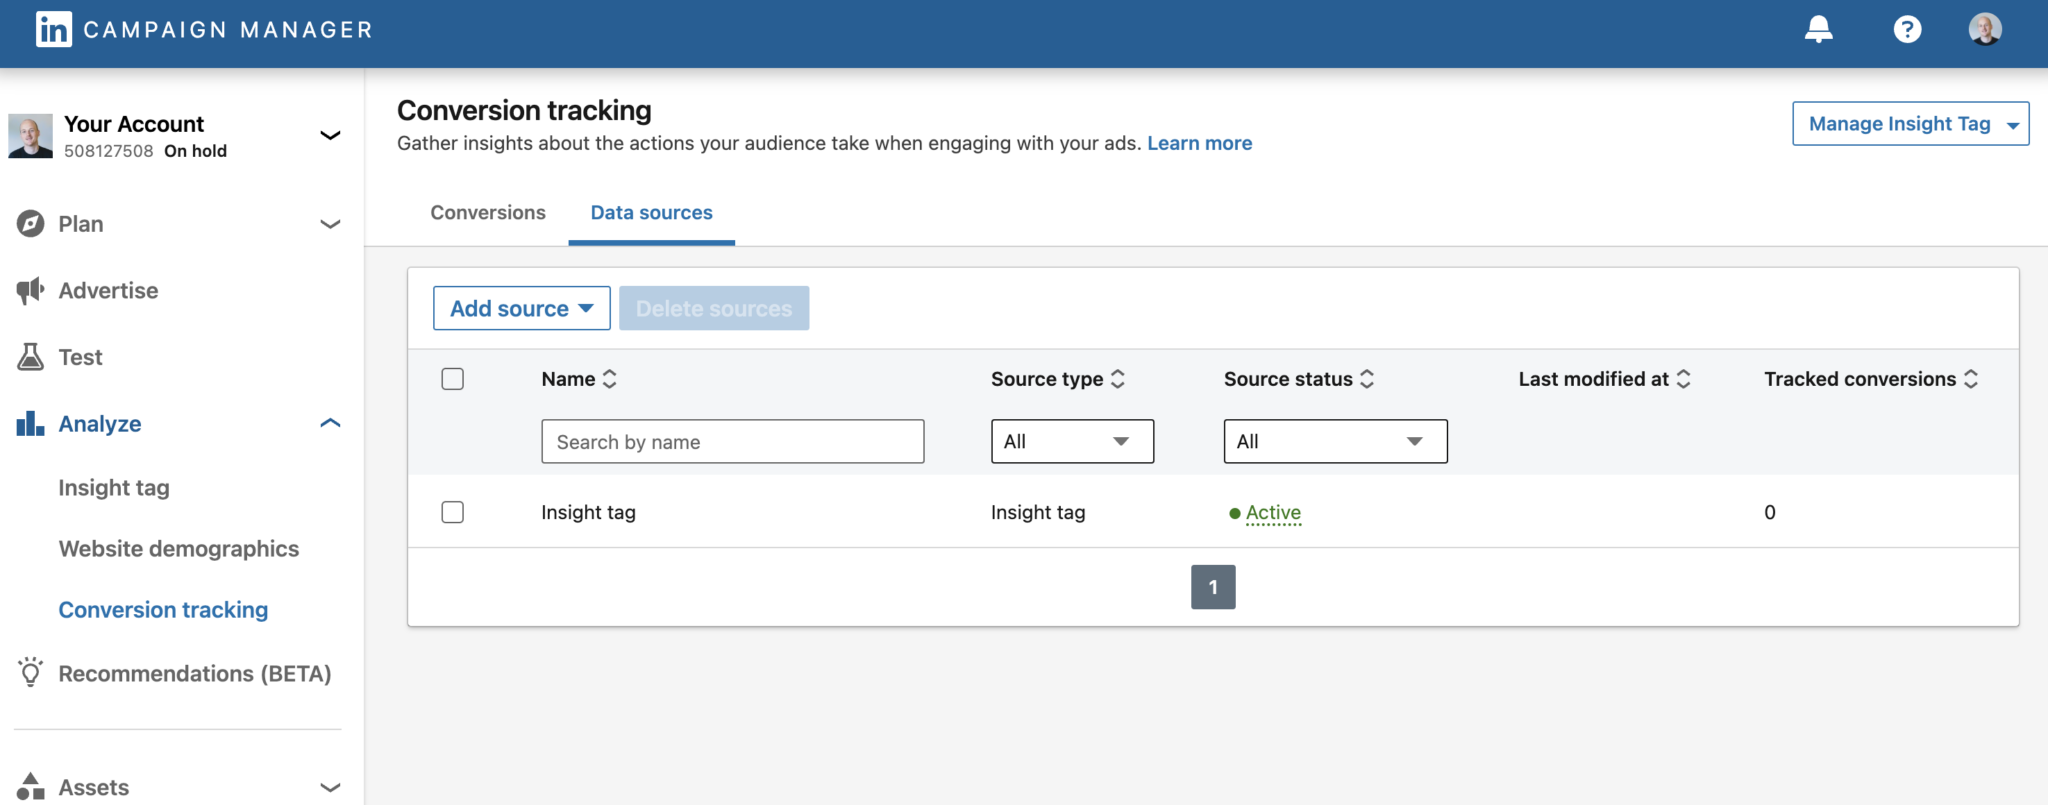
Once your website has received some visitors this Insight Tag icon should turn green and say “Active” like in the example below
